Saturday, February 28, 2009

SonShine

This is my last layout using Scrapmagie's February Kit (Terem Palace). I really love how she had included so many gorgeous die-cuts and pattern papers in this kit. These papers are so inspiring to me.

Here are the steps.
1) Use the die-cut pattern paper as the base for this page. Use the "Masking to Create Instant Frame/Layer" technique to create the frame around the paper.

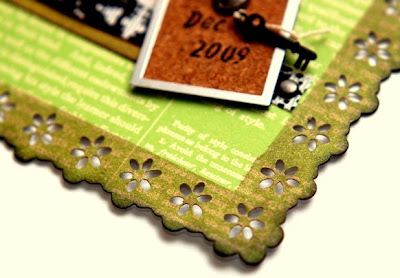
2) Cut out a strip from a pattern paper and punch on it's right edges to create the notebook paper look. Ink it's edges with distress ink and paste it to the page.

3) Cut another strip from a decorative edge pattern paper and ink it's edges with distress ink. Paste it on the page slightly overlapping the strip above.

4) Stencil a tag shape using distress ink on the left of the page and attach a damask sticker (included in the kit) on top of it.

5) Punch along the right edges of the photograph and distress it's upper and right edges using a sanding block. Paste it on the page.

6) Use the "Crackle Effect on Frames and Tags" technique to create the huge crackled frame and attach it to the page with some brads.

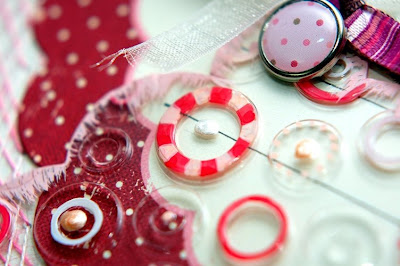
7) Add a strip of ribbon on the bottom of the page and add some embellishments on the lower right corner. I've actually hand written some messages for Ryan to read a year later and put it in the little bottle. He is so excited about this and can't wait to read it....lol!

8) Mat some words stickers onto card stock and cut it out. Paste it to the lower left using foam adhesives.

9) I've cut out the "SON" from pattern paper and ink it's edges with distress ink. Attach them to the page using foam adhesives.

10) The word "shine" had been cut out using some raw chipboard and dress up with a yarn tying them together with the bottle on the lower right of the page.

I've had so much fun playing with the techniques on this page. Hope you all try it too!

Sources: Scrapmagie February's Kit (Terem Palace): Pattern Paper: Creative Imaginatins, Making Memories; Embellishments: Little Yellow Bicycle ribbon, Heidi Swapp Damask Sticker, Little Yellow Bicycle die-cut stickers; Others not included in the kit: Ranger Distress Ink, Ranger Liquid Pearls, Making Memories Acrylic Paint, crackle solution, Zig Writers, chipboards, small embellishments, brads, yarn, Helmar glue, Glue dots and other adhesives.

Friday, February 27, 2009

Masking to Create an Instant Frame/Layer

I've actually used this technique quite a number of times already but I think it's even more fun when using it on a die cut pattern paper. I know that die-cut pattern paper can be very challenging to work with and we try not to cover the gorgeous design on it. Therefore, actual layering on top of it would not be a very good choice.
Therefore, instead of layering another huge piece of pattern paper on top of it, I've used the edges of a scrap as template and start masking using distress ink, all around the edges of the die-cut pattern paper. This would create an instant frame/ layer to your page. Fast and easy!

Thursday, February 26, 2009

Sweet Angel

This is another layout that I've created using Scrapmagie's Terem Palace kit and a mini acrylic cupcake from Clear Scraps.This is such a right layout to share now...lol! Chloe has a boyish side which I've always adore as I'm kind of boyish too in the past. Isn't she sweet and cute while throwing that football?

Here are the steps to it.

1) Use the Artisan Floral Rouge pattern paper (included in the kit) as the base for this page.

2) Use a strip of scraps to create your own scallop edges masking template and do some masking using distress ink on the top and bottom of the page.

3) Cut out a huge rectangular piece from a pick card stock and ink it's edges with distress ink. Paste it to the right of the page.

4) Use a piece of the journaling notebook sheet (included in the kit) and paste it on the lower left of the piece above.

5) Cut out another huge piece of rectangular or pocket from a pattern paper and ink it's edges with distress ink. Hand stitch on three of it's edges and attach it over the piece of card stock earlier. You should still be able to see the top of the card stock. (kind of liked the library card)

6) Distress the edges of the photographs using the scissors distressing technique and paste them onto the page with a piece of card stock layering underneath each of them.

7) Hand stitch the huge circle using the "Net Stitching" technique and dress up the stitching holes with some liquid pearls.

8) Add a rub-on flourish and a flower with a jewel brad on the lower right of the page. Use the "Water in-your Flowers" technique on the flower.


9) I've used the "Acrylic Embellishment" technique to create the acrylic cupcake piece for the page.

10) The word "sweet" is actually rub-ons and the word "angel" is an epoxy sticker.

I just love how this page turns out to be really sweet!! lol!! Hope you all like it!

Sources: Scrapmagie February's Kit (Terem Palace): Pattern Paper: Making Memories, Basic Grey, Little Yellow Bicycle; Embellishments: Prima flowers, Making Memories brad, Basic Grey rub-on, Making Memories Journaling Notebook sheet; Others not included in the kit: Clear Scraps acrylic mini cupcake, Bazzill Cardstock, EKSuccess Zig Painty, Zig Writers, Ranger Distress Ink, Ranger Liquid Pearls, Ranger Glossy Accents, American crafts Rub-ons, Prima Epoxy Sticker, jewel brad, small beads, floss for stitching, laces, ribbons, Helmar glue, glue dots and other adhesives

Wednesday, February 25, 2009

Water in your Flowers

I've actually shared about a technique called "Freshen Up your Flowers" in one of my older post. This technique is a step ahead of that. Instead of just creating droplets of water on and around the flower, you can also create small puddles of water in your flower.

My inspiration for this technique actually came to me when I try to water some of my plants and it seems that when I try to wet the flowers, some of the water would get caught up in it.

Therefore, I've tried to create the same here. Simply used some glossy accents and spread it in the center of the flower and on some of it's petals. I really love the effect of this. Try it!

Tuesday, February 24, 2009

My Dream Came True!!

This few days had been kind of sweet and sour for me. The sour or rather bitter part is that I've been under food poisoning and had not been able to eat much and got a little dehydrated. I'm feeling much better now after taking some medications from the DR.

And now, comes the very sweet part which is also my dream came true!! I bet most of you know Tim Holtz!! I love all his work and his products! I think you all would agree with me on this as most of my projects would consist of at least one product from his line!...lol! He is so talented! And here's the spill!...

I've been offered by Tim Holtz to design for him!! Isn't that cool!! and of course I say "YES"! I would never imagine that this would happened. But it did! Thanks Tim for this cool opportunity!! Together you and my fellow blog readers had made this dream came true for me!! Thank you!

Monday, February 23, 2009

Acrylic Embellishment

Have you had a sweet and fun weekend? Hope you all do. Here's another technique that would really "SWEET" up your page.

I've created an embellishment for one of my layouts using Clear Scraps acrylic minis. In my example above, I've used a cupcake acrylic piece and run the top of it through an embossing tool with an embossing folder full of circles. Then, I've painted it's edges with acrylic paints and add some colours to it using paint markers and liquid pearls. To finish it off, I've added a pattern paper, ribbon, brad and a strip of lace to it.

These Clear Scraps minis are so fun and there's endless possibilities to them!

QKD Stamps Giveaway Winner: Lingzie

Lingzie is the winner of my second QKD stamps Giveaway in January 2009! Her prize is a set of stamps designed by me for QKD! (Asian Flair Stamps set)

Lingzie had created some really cool projects using those stamps. She had sent me some pictures to share with us.

This is a 9"x9" layout that she had created using the some stamping and loads of cutting technique. She had used the "Distance Effect" technique with the "Cherry Blossom" stamp on the upper right corner and later dress it up with some Stickles. Isn't this beautiful? She had also stamped the "Chinese Characters" image on the photograph itself.
This second project is a Birthday card. She had used quite a number of techniques in the process of creating this card and most of them are also her first time. She had stamped using the "Distance Effect" technique with the "Cherry Blossom" stamp and later use the "Scissors and Water Distressing" technique on it. She had also used the "bamboo" stamp to create a border at the bottom of the card. Inside the card, she had used the "Lotus Flower" stamp to dress up around the photograph.

Aren't these projects beautiful? Thank you Lingzie for sharing your projects and talent with us!

Sunday, February 22, 2009

Winner For QKD's "Romance" Stamp Set Giveaway!!

The winner for my "Romance" Stamps set giveaway is

Nina said...
LOVE your work!! You are very inspiring!


Happy Valentines day to you! I'm sitting here alone...the weather was nice today so I went for a walk...and I've been cleaning my apartment. That's about it! :)

My dear boyfriend couldn't come and visit me this weekend - I temporarily live and work on a little island 3 hrs and a ferrie away from him. We're celebrating Valentines + our 7 year anniversary next weekend instead...with some home-made sushi (our favourite!)!! Thanks for the chance to win your gorgeous stamps!

Congrats!!! Please click on the "email me" on the right of this blog and email me your address so that I could mail the stamps out to you. Thank you to all who had participated!

Queen Kat Designs Get Inked! Kit for March is not up for pre-ordering. If you want to guarantee yourself a set of March's stamp set and some fun mediums to play along, get your kit while it's still available. I think there are only a few kits left. Here's the link to it.

Friday, February 20, 2009

I Want to Be...

This is another layout using Scrapmagie's Terem Palace kit. I just love all the gorgeous papers and embellishment in that kit. It's just perfect for my style of scrapping.

I've also used a few QKD's stamps in creating this layout. One of it is the heart from the "Romance" stamp set where I'm having a giveaway now. Just scroll on down below to participate.

This layout is about me and what I want to be.

Here are the steps.
1) Use a pattern paper as the base for this page. Distress the edges using the scissors distressing and tear in technique. Ink it with distress ink.

2) Use the "Jazz Up your Pattern Paper with some Stamping" technique on the upper right corner of the page.

3) Use the "Extreme Punching to Distress" technique on the upper right corner of the page too. Ink it with distress ink.

4) Distress the photograph using the scissors distressing and the tear in technique. Ink it with distress ink. Paste it to the page. Insert a card stock sticker underneath it's lower right.

5) Use a strip of pattern paper and create the framing on the left and bottom of the photograph using the "Fold Over your Pattern Paper" technique. Use the "Extreme Punching to Distress" technique to distress the edges and fold it's upper left and lower right corners before attaching it to the page.

6) Cut a strip from the velvet pattern paper (included in the kit) and paste it vertically on the left of the page.

7) Add another flourishes card stock sticker and two strips of ribbons forming a "X" below the photograph. Add a dimensional flocked circle sticker on the intersection of the two ribbons.

8) Use various layers of flowers (included in the kit) to form the flower and ink it lightly with some distress ink. Add the heart brad (included in the kit) and some crystals in the middle.

9) I've hand written the title and add a transparent die cut (included in the kit) to the page.

I really love how this page turns out and hope you all like it too.


Sources: Scrapmagie February's Kit (Terem Palace): Pattern Paper: Little Yellow Bicycle, 7Gypsies; Embellishments: Little Yellow Bicycle Dimensional Flocked Stickers, Little Yellow Bicycle Card stock Stickers, Creative Imaginations Heart Brad, Little Yellow Bicycle ribbon, Little Yellow Bicycle Transparent Die Cut, Prima Flowers; Others not included in the kit: Queen Kat Designs Stamps, Zig Writer, Ranger Distress Ink, Ranger Embossing Ink, Clear embossing powder, Helmar glue, glue dots and other adhesives.

Thursday, February 19, 2009

Jazz Up Your Pattern Paper with some Stamping


This is another technique that I've used recently.

Here's what I've done.
1) Stamp the "harlequin" background stamp image on the area using clear embossing ink and pour some fine clear embossing powder over it. Tilt the excess and emboss it using a heating tool.
2) Ink the area using some lighter shade of distress ink.
3) Stamp the "heart" image on it using clear embossing ink and heat emboss it again using some fine clear embossing powder.
4) Ink over it with some darker shade of distress ink. Use as many shades of distress inks as you wish. Use a wet wipe to wipe off the distress ink on top of the heat embossed image.
5) Lastly, sprinkle some water onto it using your fingers to create a water distressing effect.
This is a very easy technique to add a little personal touch to your pattern paper. Try it!

Wednesday, February 18, 2009

Fold Over Your Pattern Paper

This is a technique that I've used in a layout that I will upload to share soon. While I was creating this page, I realized that, there are so many double sided pattern papers in the Scrapmagie February Kit (Terem Palace). Both sides works so well together. I know that we used to cut them into strips and layer them on each other.
But in my layout, I've decided not to cut them into strips but to only cut out one long strip. I've place down the strip vertically and then when it comes to the "used to be an intersection area", I just fold it over to create an "L" shape. It create such a cool effect and unique design. Try it!

Tuesday, February 17, 2009

One Of A Kind

This is another project using Scrapmagie's February Kit (Terem Palace) and the "Romance" stamp set from QKD. I've also used an acrylic circle from Clear Scraps on this page.

Here are the steps to it.

1) Use a decorative edges pattern paper as the base for this page. Use the "3D Stitching" technique to stitch along huge circle on the pattern paper.

2) Use a scrap to create a huge scalloped circle masking template and mask the image on the pattern paper using various distress ink. I've also stenciled a circle using the same distress inks on the lower right of the page. Create another film strip masking template out of scraps and do some masking with it on the left of the page.

3) Distress the edges of the photograph using the scissors distressing technique and ink it with distress ink. Paste it in the middle of the page.

4) Cut out a circle on the upper right of the page and ink it's edges with distress ink. Emboss an acrylic circle using the "Embossing on Acrylics" technique and paint its' edges with acrylic paint. Paste it over the cut out circle on the page and use the "Hand Stitching on Acrylic" technique to stitch a few cross stitches on the acrylic circle.

5) Use some Dottie Ann mesh as template to mask some dots using acrylic paint on the lower left of the photograph. Also mask a circular edge using distress ink on the lower left corner. Use a black pen to doodle some faux stitches.

6) Add a transparent die-cut on the lower right of the photograph within the masked circle.

7) Hand drawn a circle on the right and add a small card stock circle sticker too.

8) Add a strip of borders flocked sticker on the bottom of the page. Layer another strip of ribbon on top of it.

9) Stamp the "heart" image using solvent ink on a white card stock. Colour it using the "Crayon Resist" technique. Cut it out and add some glossy accents to it. Paste it to the page using some foam adhesives. Add another chipboard center on the right of the strip.

10) For the title, the word "ONE" is formed using some chipboard letters. The words "of a" are actually some epoxy stickers and lastly the word "kind" is created using some glittered stickers (included in the kit).

This is a very fun and experimental page for me. Hope it would inspire some of you to try something new. For a chance to win the "Romance" stamp set by QKD, simply scroll down and participate in the giveaway that I'm having now.

I really enjoyed reading all the comments. Hope you all had a very warm and loving Valentine's Day!

Sources: Scrapmagie February's Kit (Terem Palace): Pattern Paper: Little Yellow Bicycle; Embellishments: Little Yellow Bicycle Borders Flocked Stickers, Little Yellow Bicycle Card stock Stickers, Prima Chipboard Centers, Little Yellow Bicycle ribbon, Little Yellow Bicycle Transparent Die Cut, Making Memories Shimmer Alpha Stickers; Others not included in the kit: Clear Scraps acrylic circle, Bazzill Card Stock, Tsukineko Staz On, Ranger Distress Ink, Ranger Glossy Accents, Dottie Ann Mesh, American Crafts Thickers, acrylic paint, paper ribbon, floss for stitching, Helmar glue, glue dots and other adhesives.

LinkWithin

Blog Widget by LinkWithin